
Emergence: Part 6 – Blazing Sun
So what is left on this quilt to finish? Once a quilt is quilted, isn’t that the last step before binding? What in the world is left to do???
And the answer is – the sun!
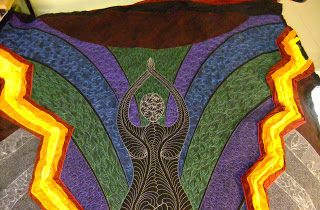 The sun on this quilt has always been a design problem. I tried to design rays to the sun in the original drawing and it never quite worked right. I was also impatient to get started and, as usual, my impatience caused me to race ahead without getting that area fixed to my satisfaction.
So when it came time to quilt it, this area is noticeably lack luster. Just a big red oval at the top of this quilt. BORING!
It also absolutely doesn’t jive with the big torn section which is big, bold, bright, and cheerful. I realized while looking at this quilt on the wall that the torn section really needs a balancing element at the top of the quilt and the easiest thing to add would be a big, bold, bright, cheerful sun.
So how do you attach a sun that you didn’t originally design into the quilt, and since the area is already quilted, how do you actually get it into the quilt without messing something up?
Well, the easy answer is that there isn’t an easy answer!
It certainly helps to plan this stuff in advance, but if that isn’t an option, it’s a good idea to give the troublesome area a LOT of thought.
I’ve been brainstorming constantly as I finished quilting the last gray ring around the sinkhole section. I brain stormed even more as I tamed the torn section with a full spool of water soluble thread (more on why later). All this time to sit and stitch gave me loads of time to think about how I want this area to look and feel on the quilt.
In the end I decided to use Trapplique, a technique created by my animating friend Nina Paley, which basically involves quilting separate elements, then cutting them out, layering them, then satin stitching the snot out of the edges so they all stick together.
I’m also playing with decorative bobbin thread work, using Razzle Dazzle thread in the bobbin and stitching from the back of certain pieces to create rows of bright, metallic glitz on the surface.
It all sounds complicated, but it’s really not. It’s as simple as creating a puzzle, then cutting it apart, then putting it back together again.
So here’s the step by step:
First I designed the sun. At the same time I’ve also designed a rainbow for the back – more on that later. I’ve started designing quilts first on paper, then loading them into my graphic design program Serif Draw Plus and tracing all the drawn lines to create a vector image.
This is SO helpful because I was able to go back to that drawing and fiddle with the design in order to make a sun that fit into the space around the goddess and torn section, without covering up too much of the area I quilted to death (I want to get credit for all that work!)
 The biggest issue with adding a design element this big so late in the game is that it might not fit into the design, I could make it too small, which would look weird, or I could make it too big, which could be fixed by trimming, but it might cover up something I like or look unwieldy on the surface of the quilt.
But as you can see above, this sun looks just right! I scaled the image to exactly the same size as the quilt, then printed it out on 60 sheets of paper, taped them all together, then taped that monster to my light box.
The first step was to create the rays. I knew I wanted these to be stiff, 3 dimensional rays that would only be attached to the sun. The tips of the rays will not be secured to the quilt top, but will instead be loose to flap around.
Why? Because it sounds cool! It might get me marks off by a quilt judge who decides it’s an unsecured applique, but I don’t really care. The side benefit of the flappy sun rays is you can then flip them up and see the pretty stitching underneath. Again, I worked hard stitching all that space! I don’t want to cover it all up never to be seen again!
Now Step 2 – creating the flame within the ray. For each ray, which is triangular shaped, I drew a wiggly fame shape within. I just drew this free form on the printed paper. I have trouble drawing certain elements on my quilts in the design program simply because sometimes I need to see how big something will be, control the curve, etc. I doubled this line to create around a 1 inch wiggly flame shape.
 It was this shape I transferred to black fabric and layered it with just one layer of batting. I drew these stacked next to one another because they were going to be cut out right on the line, so I didn’t need a lot of space between them. I then proceeded to stitch the snot out of it with silver Yenmet metallic thread using a metallic needle.
 Once all 6 flames were stitched, I cut the shapes out. Here’s a really cool thing I learned while doing this – if you cut out the outer section closely, but leave the inner section whole, you can use this as the base for the fabric in the inner section.
I knew I wanted a textured applique orange flame surrounded by the black fabric silver thread wiggly flame, then the whole thing placed on a yellow triangle. So instead of creating the orange section separately, I trimmed the black fabric away from inside each triangle, leaving the batting in place, then squished a lot of orange fabric on top and stitched it down with a ton more water soluble thread.
 Why all the water soluble? Because it’s a terrific placeholder! I want this orange fabric to be all pleated and crazy in this section, but in order to get it that way in a controlled manner, I need to first secure it down to the area, then go back over with a real thread to hold it in place for good.
The water soluble holds everything securely, much better than a million pins, and it allows me to also plan the wrinkly nature of the fabric. There’s simply no better thread to use!
Once the orange fabric was in place securely, I went back over the section first with a wide 5 pt satin stitch all along the edge to seal the raw edges of the orange and black fabrics, then went over the orange fabric with Mango Tango Razzle Dazzle thread. This thread has to go in your bobbin, so the whole thing was flipped over and stitched from the back to create this awesome double flame:
 It might not show in this photo, but this flame has got some bling!
Now this section was done and I could set them all aside while I worked on the outer, triangle shaped ray. This section was a bit trickier because I wanted it to be very stiff.
So I went through my studio and found some stiff Pellon double sided fusible stuff. This thick, it sticks, it’s probably indestructible. It certain destroyed a ton of my needles this week!
Using my light boxes, I drew the triangles on the pellon, then cut them out with my rotary cutter to make sure the sides were perfectly straight. Then I fused yellow fabric to the rough, easy fuse side of the material, leaving more than 3 inches of extra fabric on the two sides.
 The fused, flat section then became the back of the rays, and I flipped the triangles over and, using more water soluble thread, finished the tip of the triangle, then the edges so the yellow fabric was brought to the top of the triangle and secured.
 Now again, I wanted to create textured applique by squishing all this excess yellow fabric into the space between the edge of the triangle and where the flame should overlap. I traced the flame shape over the pellon, then added 1/2 for wiggle room (better to stitch over an area and have an overlap than have a section left bare).
 Again I secured all the extra fabric with water soluble thread, but in the process broke around 9 needles. This pellon is super thick and extremely hard to stitch through. I usually do the securing stitches in free motion, but with this stuff I had to switch to the even feed foot and go very slow and make huge stitches.
It also gummed up my needle so had I had to change needles several times simply because the eye was so full of gunk the thread kept breaking.
I’m not so sure that I will use this particular material for this purpose again, but it was on hand, and I had enough to make this sun, and it certainly gave the area the added stiffness I wanted. It was just a real pain to work with!
Once the fabric securing was complete, again I went back over the area with Razzle Dazzle thread, this time in yellow. I it very difficult to turn the corner and stitch right to the tip of the ray without the threads gagging up on me. The next time around I used a little piece of Solvy Water Soluble Stabilizer to hold the tip in place and it went straight through with no problem.
 Now with all the yellow sections done, they could be connected with the orange and black flame sections to finish the rays completely.
First I layered the two sections together and held them in place with pins, then made them much more secure with more water soluble thread. Big pieces like this tend to shift while satin stitching, so the water soluble ensured everything stayed in place.
Next I satin stitched with red thread to connect the two sections together, and viola! finished sun rays!
 Now reading back through all of this, you might run away with the idea that this process was fast. It wasn’t.
It took 3 days to get the orange/black flames together, then another 3 days to get the yellow sections done, then it’s taken another two days to get them together properly.
It’s not a fast technique, but I wouldn’t say it’s horribly difficult. You just need to be patient and willing to spend a lot of time stitching water soluble thread to stabilize everything before moving on to the next step.
Overall I know I’ll try this again, but without the stiff material and on a bigger scale. This technique really needs more experimenting, which I’m sure to get when I start this final sun section:
 Now I’m off to start this sun section and squish more fabric in a place it doesn’t fit, and regulate it all with another spool of water soluble thread. Yay! I couldn’t be happier with this!
Let’s go quilt,
Leah
looking forward to seeing your quilt finished…the rays of the sun are very interesting…..
Beautiful! You are so talented!
Kristie
Hi Leah.
It's amazing the work you're doing, you are staying fabulous. The drawing is very nice, but with the padding, it is becoming a truly spectacular result.
Thank you very much for sharing all your work, and process techniques to your projects.
Kisses from Granada, Spain, from espiralcaracola.blogspot.com
That is gorgeous. I love that you aren't afraid to try new things, despite so many needles breaking. I might have quit in frustration, but you plodded along. The result is fantastic.
I love, too, that you live your life for yourself only. You are the only one living it and the only one you have to please. Well, maybe you have to please your husband and son now, but I think they have your back.
Fantastic. There is something spiritual about the sun and sun images, isn't there?
Incredible Blazing Sun! Wow!
Lady, you are A – MA – ZING!!
WOW! As you started off this post, I wasn't sure how you would fix this, but WOW, just WOW! It's going to look AMAZING!
What an amazing technique – perfect for Emergence. I learn so much from your blog. Thanks, and keep it coming. Congrats too for finishing the 365 quilting designs. You rock!
You have really taken quilting to a whole new level! Beautiful work, I so look forward to seeing where you go from here.
Wow… Words just cannot describe how fabulous the sun looks and it's not even connected to her yet. How will you remove the water soluable thread or will you leave it in?
Leah, the work you do in your quilts and your creativity in solving problems etc. are out of this world. You take my breath away!
It's amazing to see your progress with this quilt!! It is really coming together fabulously … and what an incredible amount of time, patience and effort you put into it!! … I love what you came up with for the suns rays … An incredible amount of work in this design and construction, but it is SO worth it!!! Looking forward to seeing what you come up with for the main sun section!!!!
Very nice !!1
This is looking amazing.