Playing with Trapplique
I instantly fell in love. First off, I absolutely love Nina’s quilts in general and am always in awe of what she comes out with next. This technique was also intriguing because I’m always searching for a faster, easier way to create my quilts in less time and with much fewer fiddly techniques.
To say it straight – I’ve been searching for a way to kick turned edge applique out of my sewing room for good!
I keep thinking Trapplique is the way to do it, but just in case you have no idea what I’m talking about, let’s first review:
Trapplique is a combination of Trapunto and Applique.
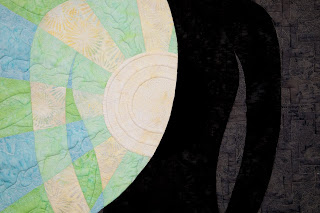
Trapunto is the art of making certain areas of your quilt puffier than the rest with an extra layer of batting. The motifs pictured below in Shadow Self were trapuntoed so they have 2 layers of batting in these areas. This makes the motifs stand out better and add more texture to the surface of the quilt.

When using trapunto you also have to use dense filler designs. While I know not everyone wants to stitch the snot out of their quilts, I do, and I love the effect!
Sometimes I’ll even paint the trapunto areas of a quilt so they stand out even more. After using this technique in Hot Cast, I found that too much painting makes Leah a very irritable girl. I’m DONE with fabric painting unless it can be done in 2 days or less.

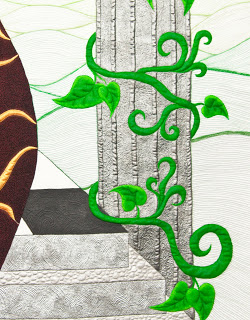
Now applique is the technique I’ve usually used to create my quilt tops. Usually this involves very large pieces of fabric, turning the edges under around freezer paper, being very meticulous with starch and glue, and generally hating my life for around 2 weeks.
While I’m good at it, construction is not my strong suit when it comes to making quilts. Imagine the fiddly mess of turning all the edges of the vines shown above. What a nightmare!
But I also love color and have a room full of beautiful fabric to use up. I absolutely refuse to just make wholecloth quilts and paint them to get the colors I want. I found out the hard way with Hot Cast that this just doesn’t create the results I’m looking for.
So here’s the problem – how do you make quilting motifs stand out in a COLORFUL way without painting it after it is quilted?
Answer – Trapplique!
The biggest problem has been forcing myself to actually TRY this technique. I think it’s a testament to how innovation can stagnate because sometimes it seems easier to just keep doing the same thing over and over rather than taking the time to learn something new.
I probably wouldn’t have taken the time to try this had Patsy Thompson not come to Shelby last week. Patsy and I really hit it off and I ended up taking her class on free motion quilting, which was absolutely excellent!
She laughed when I said I was taking the class, and then I explained that I had to force myself to try some new techniques. Sometimes the only way to get it done is to get out of the house away from all distractions, drag your machine halfway across town, then sit down and play!
So during the class I created a small block using Nina’s basic steps to Trapplique:
1. Draw your applique shape on fabric
2. Layer this fabric with batting
3. Quilt the applique shape with motifs and fillers as desired
4. Cut out the shape
5. Pin it to the quilted quilt top
6. Satin stitch it down:Even playing with this small practice piece, I can already see that this is the technique for me! The ease of quilting, cutting, and satin stitching sure beats turning edges and trying to get a decent point on tiny, fiddly pieces.
There many questions from this experiment left to be answered:
1. Can this be done without satin stitching through the quilt? The way this technique is right now a whole lot of satin stitching will show and especially if I use decorative threads on top, the back could start looking pretty bad.
Maybe I’m being silly, but every single person that looks at my quilts does the same thing. They look at the stitching hard on the front, then flip it over to look at it on the back. I even found myself doing this with Patsy’s quilts!
I think mostly this is an urge to make sure that what we are seeing is real. Is the stitching really that perfect, and more importantly, is it that perfect even on the back?
2. How delicate of a motif can you make with this technique? – This is an interesting question because my motifs have been getting quite intricate as of late. Could you do a complex Baltimore Album style block with this technique for example?
3. What other techniques can be combined? – I also decided to try couching for the first time during Patsy’s workshop. I’d never really experimented with decorative threads, despite having a huge collection of them.
For this block I couched around the applique shapes and found the addition of the white decorative thread to be quite a nice element. The only problem is the start and stop (way too obvious) and the difficulty of quilting around this after it’s been couched. What if the decorative threads were couched over a trapplique AFTER it was quilted? Hmmm….that could work….
The only way to know is to try it!
Of course, it’s hard to get an idea of what this technique can do with just small blocks.
That’s why I just designed a small wall hanging for James to try this technique out with some real colors! James is absolutely obsessed with space and robots so I figure this Mars Landing wall hanging will be a nice addition to his room.
Instead of satin stitching the planets and rocket ship through the quilt, I’m instead going to try hand stitching them down. It will be an interesting experiment to study the boundaries of trapplique and where we can go with this new technique.
Now I don’t know about you, but I’m ready to rip this pattern off the wall and get stitching!
Let’s go quilt,
Leah Day

Wow! This is great! Do you also use a backing for the individual pieces, or just top fabric with batting? I will try this for sure with some of the FMQ samples I make from your designs and from Patsy Thompson's CDs I have. You are so lucky to have attented some of Patsy Thompson's workshops!
Hi Anne-Marie – I just used batting on the backs of my trapplique, no backing fabric. I figure – why waste the fabric when it's not going to show once it's stitched onto the quilt?
I use polyester felt – craft felt you can get really cheap – because it's cheaper and has a slightly stiffer feel which makes it great for this kind of work.
Really any kind of batting will do so now you have something you can do with all those batting scraps!
Cheers,
Leah
This is wonderful. I have never tried trapunto but this seams like it would be a great effect for applique. When I am doing lots of dense satin stitching I use a thin fusible web under my batting (for stabilizing) and later add the backing and quilt around the motifs and sometimes in the motif… This way the satin stiches are enclosed inside the quilt and not showing up like a sore thumb on the back. I love this new trapplique technique and will have to try it out soon!
That is too funny! I JUST emailed Patsy – she is fantastic! And I was trying to arrange attending her class last week! My 2 favourite quilters in the same place….wow! An interesting technique – I will file that somewhere in the brain for the future when I know the the heck I'm doing! I am satin stitching at this very moment (a break to check the blog) and since it's my first time, I had some questions! Thanks again!
Hi, Im not a quilter (well not yet) but enjoy reading your posts as I am planning to get into it.
The problems with the back of the quilt: Could you construct your trapplique pieces place them and then sow onto the top before you apply the batting then quilt the remaining areas as normal
(or just keep the backing material off whilst attaching the trapplique piece if you want to go through the batting)
Just a thought, hope it might help.
Pippa
Interesting technique! I too am not a huge fan of turn under applique – although so of my designs do call for it. For my looser stuff I use raw edge applique (without fusing!). I love to put thread work into my pieces so once all the fabric is down I just put in the color thread work over it – it comes out great and I still get the nice puffs to add texture!
Hi, I like this!! But I just keep trying do your freemotion designs and take a LITTLE step forward every day! It's fun!
Thanks for fine videos!
Cheers,
Kerstin
Woohoo, thanks for the mention Leah!
I use thin unbleached muslin for the backs of my trapplique pieces, because it helps hold everything together and keeps extra batting fuzz from getting sucked into the sewing machine. But it's true, those bits of fabric will never be seen by anyone, as they get sandwiched into the quilt.
It's always fun to read your blog, even as I have completely stopped quilting for the Summer. It's just too darned hot in New York right now. Hopefully I'll get back into the groove once it cools down.
Thank you for introducing me to Nina Paley site. Her work is imaginative and innovative. To reduce the messiness from the satin stitching, what if you applique your pieces before doing the sandwich for the entire quilt?
You've helped expand my future quilting possibilities. Hooray for the creative mind! I'm a constant follower of your site, but don't know if any of my WordPress blogs are getting through.