
How to Block a Quilt
 Hallelujah! I’m finally, absolutely, totally, and completely finished with this Beginner Quilting DVD! Yahoo! I’m really, really pleased with how much I managed to squeeze into 2 hours of time.
I watched the first disc 2 days ago and the second disc today and sat back and thought “Man, I wish I’d had this info when I started!” Ha!
Nope, Not Everything Fit
Of course, I didn’t have time for EVERYTHING I wanted to include, but I hit ALMOST everything and I think it’s a great first start to free motion quilting, particularly quilting big quilts on domestic sewing machines.
The things that I didn’t have time for were using stencils to mark designs and how to block and bind a finished quilt.
Technically these things aren’t really truly about free motion quilting so I could justify leaving them out, but still…I want you to know how to do them!
So I’m planning on still shooting those videos next week and I’ll share them on You Tube, but for today let me walk you through blocking your quilt after you’ve finished quilting.
First question I’m sure you have is:
What the heck is blocking and why in the world do you want to do it?
Blocking is another word for squaring your quilt. You’ve just quilted it and the quilting stitches can cause the top to stretch and skew out of square.
By blocking your quilt, you return your quilt top to square and get it prepared for binding all in one step.
How to Block a Quilt
1. Measure your quilt top – This is super important and I almost always forget it. You MUST measure both the length and width of your quilt top through the center to get an accurate measurement. Record these measurements – you will need it later.
2. Soak your quilt in water – I use my bathtub for this, but a washing machine can work too. You just want to get the quilt wet and make sure any markings on the quilt have dissolved if you’ve marked it.
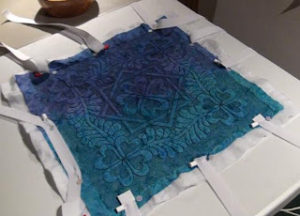
My quilts look pretty tortured when they’re being blocked!
3. Stretch the quilt out on the floor or table – I have a design wall made of 2″ Styrofoam insulation boards that I throw down on the floor for blocking.
It’s extremely useful and though I hate scrambling around on the floor, I must admit it’s the best thing for this method.
4. Start Pinning! – Starting on one side, pin the edge of the quilt to your floor or foam insulation. Make sure to pin this side square with the straight edge of the board. I keep a tape measure in my hand the whole time and work from the center, only pinning around 12 inches.
Move to the opposite side and measure your quilt. If you have to stretch the quilt back to the original dimensions you recorded in step 1. Pin securely from the center working out, constantly checking that your measurement stays the same.
Do the same for the other side. Secure one end, then measure and secure the other. It’s great if you have a buddy for this job, but I’ve learned that it’s possible to do on your own with a tape measure that will lock and stay flat on the quilt.
Leave the last 24″ around the corner open and do each of these areas last with a big square rotary cutting ruler.
Take Extra Care in the Corners
Using the ruler, try the square the sides with the corners so that everything stays nice and flat and even.
You might have to do some tweaking in the corner the first time you try this. Corners are notoriously the hardest areas because we tend to piece them out of square to start, then stretch them a bit when quilting.
Just take your time and bring you whole quilt back into the dimensions you originally recorded before getting your quilt wet.
5. Set up fans and go piece your binding – Typically I will start blocking a quilt around 8 pm and get the quilt fully pinned and blocked in about an hour, depending on how complicated the quilt is.
If I get started early enough, I will go on and cut and piece all of my binding strips, which sets everything up perfectly to bind first thing the next morning.
Make sure to set up fans! The one time I didn’t do this I woke up to a wet quilt. I wasn’t a happy camper.
Now it’s Time for Binding
6. Cut the quilt to square and bind – Since the quilt is already all nicely stretched out on the floor, once it’s dry I just take the pins out and trim the edges right there on the floor with my rotary cutter.
Again, make sure to trim carefully, using the largest square ruler you own for the corners and longest rectangular ruler for the sides.
For binding, I first attach the strips to the front using the machine, then stitching down the loose side by hand to the back.
If the quilt is not for show or particularly special then I will stitch the binding to the back and fold it over to the front and stitch both by machine. It just depends on how lazy I’m feeling that day!
I like having a hand project occasionally so I like the little bit of downtime to stitch the binding down.
I think that just about covers blocking your quilt. I’ll try to do a video on this soon. I have 2 completed quilt tops ready for binding – whoohoo! – so I know I’ll be downstairs pulling my design wall off the wall sometime soon.
Okay, I think that covers blocking your quilt. Any questions on the method leave them in the comments below!
I’m off to cook more food. We’re throwing a little party tonight, celebrating Valentine’s Day and the end of my kitchen remodel. I’m so happy I finished the DVD it’s time to celebrate!
Ya’ll have a great day and GO QUILT!
Leah
Genius! I've never blocked a quilt nor thought about it… but it would add so much to my finished project! Thanks! I do have one question though… we have hard wood floors throughout our apartment and only one rug. When you suggest pinning the quilt to the floor, I assume you are thinking of carpet??
Leah
congratulations on your DVD's(what happenened in the end re computer?)
Your information and instructions are always so clear,looking forward to DVD release
Now as a surrogate mum look after yourself
Judi
Mrs. Smith – Yeah, I was thinking of carpet where you can pin into the carpet to hold the quilt securely.
In your case, the best way to block will be with styrofoam boards. 2" styrofoam is the best and it can double as a very useful design wall.
Let's go Block!
Leah Day
you said:
If the quilt is not for show or particularly special then I will stitch the binding to the back and fold it over to the front and stitch both by machine. It just depends on how lazy I'm feeling that day!
May I suggest a little something different? http://www.patchworktimes.com/2009/06/05/binding-vide/
I saw this video over on Judy Laquardia's blog and it is my preferred way to machine finish a binding. You WILL LOVE IT, after you try it.
Here is a post where I most recently used this method and took some closeups! From the front of the the quilt you see nothing – and the back looks perfect! Take a look… 😉
http://bingobonnie.blogspot.com/2010/01/houston-we-had-small-problem.html
Hope this helps and Congrats on the DVD release! 😉
Love from Texas! ~bonnie
I teach beginner quiltmaking and always have newbies keep the backing and batting intact until the binding is sewn to the quilt. Then the backing and batting are cut away 3/8" from the stitching line. That makes for a stuffed binding.
And personally, I prefer to sew binding to a quilt in four separate pieces, using each measured binding strip to help square up the quilt.
No criticisms here; just sharing. You can see a binding tutorial on my blog.
Thats just great Leah, good job –
Thank you much! I've never blocked a quilt, but I can see the benefits in doing it. I'm working on a baby quilt right now, so it will be my guinea pig!
I also have never blocked my quilts. I'm very careful about piecing and they are all pretty straight. What am i going to get out of blocking? thanks , Claire
Twodraftmom – Well, it's kind of the difference between the sides and corners being "pretty straight" and perfectly straight.
Of course, it's always a personal choice and not really necessary on a bed quilt.
For wall hangings it's absolutely necessary to get everything to hang square and flat.
Cheers!
Leah
Bonnie – Nice video! I like your binding method, but really prefer to stitch the open side down by hand.
I just seem to have a better finish when I have absolute control over where the stitches are going.
Thanks for sharing,
Leah
I have never blocked a quilt before but this makes total sense. I have a question regarding the part where I leave 24 inches free.
Assuming I pin the left side first, are you suggesting we leave the bottom right corner unpinned?
Thanks for the info. I have never blocked my quilts but this makes sense especially when I do hand quilting and sometimes the measurements are off depending on how tight I do my stitches.
I do have a question regarding the instructions where you say to leave the last 24 inches free. I assume this is the bottom right corner (if you pin the left side first. Or am I totally confused.
I tried a couple of your freemotion designs and totally love it. Thanks so much!!!
Hi Gigi – Sorry about all the confusion! Looks like this technique really needs a video.
You leave the corners unpinned, then using a large square ruler, pin them carefully while squaring the corner to the dimensions of the sides.
You don't leave them unpinned, but just secure them last.
I hope that makes sense!
Leah
Congratulations on completing the DVD Leah and thank you for these great instructions for blocking. It has so far been a mystery to me but I shall know what to do next time I attempt a quilt :o)
Would you block before or after adding beaded embellishment?
Karen
Hi Leah:
Just finished blocking my quilt, as per your instructions. I think it looks pretty good. My first attempt at machine quilting a full size (lap) quilt and I guess I threw it off kilter. Anyway, of course, all the markings did not come off ( don't think I left it in the water long enough, nervous), so I will probably have to wash it again. My question is, will I have to block again or will it hold "true"?
Thanks for the great advice!!
Sandra