Day 116 – Creepy Bug
He also happens to be extremely terrified of any bug that actually moves. Cartoons and pictures are one thing, real life creepy crawlies are a totally different matter.
For some reason ALL BUGS, no matter how big or small, are ladybugs. He even has a chant that he yells with a plastic flyswatter in hand: “NO MORE LADYBUGS! NO MORE LADYBUGS!”
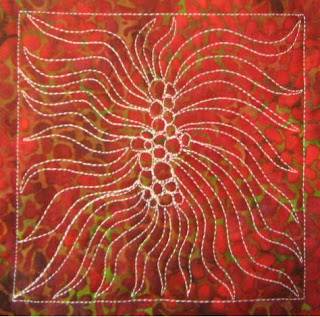
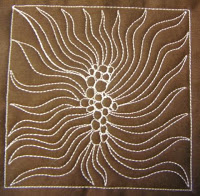
So in the spirit of my son’s love/hate relationship with bugs, let’s learn how to quilt Creepy Bug!
 So today is the day! Today is the day that everything happens: the kitchen will be officially, totally and completely finished, we will finally have our house back to normal, and I will be driving to Concord, NC for my first ever quilting lecture. YAY!
I was feeling a bit nervous last week, but now I’m ready to go and super excited about it!
I’ve collected all my quilts from around the house, attempted to dust and lint roll them a bit, and stacked them up ready to be packed in the car. Looking at the stack, I’m starting to cross my fingers that it will all fit!
Inspiration – This design was really an experiment to see if pebbling could be combined with slightly wiggly lines, like Striated Earth, to make a new design.
When it started resembling a bug, I realized that this design does have quite a lot of potential!
Difficulty Level – Intermediate. This design isn’t very difficult and can be easily expanded to fill big blocks and large surfaces very easily.
Design Family – Center Fill. This design is stitched from one edge of your quilting space to the center, making this design perfect for the open, uncomplicated areas of your quilt.
Directional Texture – Center Focused. You really can’t ignore the creepy bug in this design! Definitely place this filler where you want more attention for your quilt. The centers of appliqued flowers would be a great place to put some creepy bugs!
Suggestions for Use – I really like this buggy design and think it would be a terrific addition to a simple baby quilt. Babies really see high contrast well so maybe stitch these bugs with white thread on black fabric for a very untraditional baby quilt.
 Feel free to use this free motion filler designs in your quilts,
and make sure to tell your friends where you learned it.
Click here to support the project by visiting our online quilt shop.
Leah Day

Wish I could go with you to hear your presentation…. I am sure there will be so much to learn…. do hope you have BIG suitcases with wheels for the quilts…. or a cart??? Anything to make the lugging and what not …. smooth…. good luck to you.
THEN the kitchen…. that is way BIG…. I lived through one kitchen redo back to studs and was so happy to have the kitchen back working, etc. Enjoy.
There is a lot packed into this day, so where to begin?
How did you decide to do the rays or legs first. I was all ready for you t go to the middle and do the body and then the legs and you did not do it that way – so what was your thought process, if you don't mind sharing. That is one thing about your things you tell us so much of how you arrive at things.
Creppy Bug – but my bug will not be creepy and Sunshine are going to be on my next quilt.
I am so glad I found your site!!!! You make me smile and laugh, and I love that all bugs are 'ladybugs'!!
I love this spider – and I will learn to do this……… I have to. And you, with all the little tips and little video's make it looks so easy, I need to get over my adversion to this. I even took a class, and am still not doing it!!!!!! I need to get over my fear of changing the dials on my machine – I am scared I will not get it back to where I can use it 'normally'….. dumb huh… I have to keep telling myself, I am the master of my machine….. I love your blog!! Thank-You so much!!!
best of luck for your lecture, I'm sure you will knock their socks off! and hurray for a finished kitchen x
Good luck on your lecture – I'm sure you will be great and have fun! Have someone take pictures and post some. Would love to see them. Have a safe drive:)
Laura T
Brenda – Come on girl! Twist those dials! You never know, you may get them into a place BETTER than where they started at.
Marianne – I'm not sure why I choose to go edge to center with this design.
I think it's because I wasn't feeling like breaking thread that day! As silly as that sounds, that can sometimes be the reason I choose one design over another.
The beauty of this design is that it works both ways, so it doesn't matter if you start from the edge or start from the center.
No matter which way you quilt it, it's going to look cool. Just go try it!
Let's go quilt!
Leah Day
Leah
It may be a Creepy Bug to you, but to me it looks like some kind of exotic plant. And I like it.
By the time you read this you will already have given your lecture. But I'll give you some advice anyway as you're sure to be giving lots more. Everybody in your audience wants you to succeed just as much as you do; they're on your side. So relax and enjoy it and them.
Leah – I don't like bugs very much either but I really like this one. It really caught my eye. I can't wait to use it on a quilt. Thanks for the continued inspiration.
Leah – I don't like bugs either but I really like this bug!! I can't wait to try it and put it in a quilt. I have two more tops almost finished and I AM going to quilt them myself. One is for my dad so I am going to do it first. Thanks again for all the inspiration!!
Greetings from Albany, Western Australia. This design really reminds me of a banksia flower we have here in Australia. You seem to always be coming up with something new, but if you are ever looking for something to inspire you, can I suggest you look at Australian wild flowers. Lots of them are unique to this continent and many are very different to what you find in other parts of the world. Love your blog; I try to read it every day. Sam (Sandra Downes)