Quilt As You Go Connections
I know you’re all waiting to hear how I’m going to connect all the finished snowflake blocks together to form one big quilt.
Since they’re all already quilted, this could pose a pretty big problem. How do you connect the blocks together without it either a) showing somewhere what you did or b) the quilt not looking good.
This method, quilting blocks in pieces, is known as a “quilt as you go” method.
Well, in truth, this is very easy. It’s looks complicated, but really this technique is as easy as binding your quilt.
First let’s think about this for a minute. If your blocks are cut 12.5 inches, you have 1/4″ seam allowance all around it.
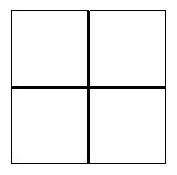
 If your block has been trimmed very accurately and it’s perfectly square, you can arrange it with other 12.5″ blocks so that they all butt up against one another with no gaps or space between.
This first diagram is 4 blocks butting up against one another perfectly.
Now the goal will be to somehow connect the blocks together across the front and back smoothly
Notice I said smoothly, not seamlessly.
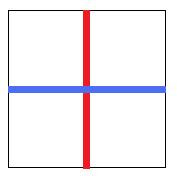
 No matter which way you do this, you’re going to have a 1/2″ strip on the front and back of the blocks. Here you see what the blocks will look like with red and blue binding.
You can’t get around the 1/2″ strip, so the best thing to do is match your strip colors to the fabric so it blends in nicely or becomes a part of the design of the overall quilt top.
Now let’s connect the quilt blocks from the top:
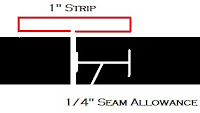
1. Cut 1 – 1″ strip the length of your block.
2. Using a very accurate seam allowance, stitch this strip to the front side of one block.
 3. Press strip away from the block.
4. Take the next block in the row and attach it to the other side of your 1″ strip, making sure that the blocks will be facing the same way once you finish the seam.
5. Press the seam allowance within the strip. The 2 seam allowances should butt up nicely together with no big gaps or overlapping.
If you try this and find you don’t have enough space (your seam allowances of the blocks are overlapping each other) you should either rip out the seam and stitch it again or cut your strips slightly wider.
Personally I would encourage you to rip out the seam and stitch it again because you really CAN get this perfectly accurate if you play with it for a bit.
Whatever you do: DON’T TRIM YOUR BLOCKS!
Your blocks are perfectly square and straight. The instant you start trimming them to make them fit within the encasing strip, you start getting out of square.
So now the tops of the blocks are together with only a single 1/2″ strip connecting them all together. Very nice!
Now let’s connect the backs of the blocks so that your seam allowance is fully encased.
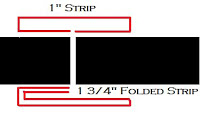
 1. Cut 1 – 1 3/4″ strip, fold it in half and press.
2. Stitch both rough edges of this strip to the back side of one of the blocks.
3. Press the folded strip away from the block and towards the seam allowance of the next block.
The folded edge should just reach the stitched line of your top seam allowance, allowing you to have an easy reference point to secure this edge by hand.
Unfortunately, there’s really no way to connect these blocks without doing some handwork or having your stitches show on one side or the other.
Quilt as You Go All By Machine
If you’d rather do this technique completely by machine with no handwork, reverse the directions and stitch the 1″ strip to the backs of the blocks and the 1 3/4″ strip to the top.
This way you can stitch the folded strip down with a decorative stitch on your sewing machine from the top of your quilt. The top will still look very nice, and your stitches will only show on the back.
This is an incredibly useful technique and will allow you to quilt your quilts in pieces, rather than in one giant piece.
You may be wondering if you need to use a walking foot for this technique. Technically, yes, a walking foot will make this process easier.
If however, your blocks are as stiff as mine are (roughly the consistency of cardboard) you can get away with your regular foot.
Just make sure that no matter what you do, you use a perfect, extremely accurate seam allowance.
This technique is very particular on having your seam allowance perfect because otherwise the strips won’t stretch and encase the seam allowances perfectly.
If you had 12 blocks to connect together to make one big quilt, you will first want to connect all the blocks in rows.
First stitch your 1″ strips on then the folded strips. You will want to secure the folded strips before connecting the rows together to complete your quilt top.
As for the Winter Wonderland Quilt, I’ve decided to do a slightly different technique that is definitely more time consuming, but will add a beautiful wavy design element to the quilt top.
I’ll detail this Curvy Quilt As You Go Connection tomorrow!

Thank you for this great Tutorial. And congratulations for your blog, I love it !!
Great description of the project. I have always loved the look of the Quilt as You Go projects.
These instructions are really great, Leah! I was just thinking about doing QAYG for a commission that I have, but only want to do the whole quilt by machine with no handwork. Duh! Reverse the process. Now why didn't I think of that! She had already admired some decorative seam stitching on another quilt, so problem solved!
Hi Leah,
I learned a quicker method if you are interested. It produces a 5/8 inch sashing.
Cut 1 strip 1-1/8" wide and 1 strip 1-3/4" wide (1 for the front and 1 for the back.) It doesn't matter which size is for front or back. The length = block size or you can leave it longer and trim as you sew.
Fold the 1-3/4" strip in half wrong sides together and press.
Then, instead of treating the front and back separately, you pin the raw edges of 1 strip to the front (right sides together) while at the same time pin the 2nd strip on the back and sew both sides on at the same time.
Then you take the 1-1/8 strip and attach that to the 2nd block the same way you indicated.
Then all you have to do to finish is either hand or machine sew the other side down (with the folded strip). Just make sure the sashing covers the previous stitching line from the other side–just like sewing folded binding.
Trim any extra sashing down to the block size.
Once you have the rows sewn together, then you use the same method to sew the rows together–the strips are just longer.
I've also dones some fancy machine stitches down the middle of the sahsing after it has been sewed together.
I hope this makes sense. Karen
Hi Karen – Yes, that is an easier way of doing it, to attach both strips at the same time.
Just make sure to keep things organized so you don't get confused which strip goes where!
Let's go Quilt!
Leah Day
Thanks for this tutorial. I have put a link to it on my freebies blog. Hugs Khris
Leah, I am doing my first quilt as you go. I saw on a show where you put the back of the blocks together and sew them, then you trim down the 1/4 seam that shows on the front. Then you take your sashing and sew it over the ugly seam on the front. I am doing the decor stitch going down the middle like a zigzag
Its a nightmare, you have the decorative stitch going every direction as it goes over that seam. I am to the part where I have to put the rows together , covered with the sashing. What looked like fun, is turning out to be a nightmare. Thought I would share my disaster , lol
Oh no Charlene! I'm so sorry it's not working out.
Try straight stitching one side onto the block, then hand stitching the opposite side. Once it's totally secure, then try a decorative stitch.
Keep playing with it and it's sure to work out!
Leah Day
Hi Leah,
I love your method for "quilt as you go" and as you said it can work for most quilts that have sashing between blocks. I've searched the web as i'm looking for a method of "quilt as you go" were you don't have any sashing between blocks on the front. Can you help or point me in the right direction as i can't find anything. My blocks are 12" finished and the whole quilt will be about 96" when finished. I'm new to free motion and have completely fallen in love with although still very much a beginner, i'd love to be able to free motion a quilt of this size in one go, but don't have the confidence yet and I only have a domestic machine.
kind regards
nikkie