Filler Design Type Explained
I have a nice stash of designs ready to share, but unfortunately did not get my act together before this flu hit to edit and add audio. So we’re out of luck on video for a few days, or until my voice decides to come back to Earth and out of snot world.
I’ve also had a load of posts bouncing around in my head and I think about them so often, that it’s easy to assume that I’ve written them already!
So here’s the first post to fix this problem!
A reader named Tess pointed out yesterday that I’ve never really bothered to fully explain the “Filler Design Type” listing in each design post. Sorry about that! In my head, I’d definitely covered it.
So here’s the back story: When I began this blog, I had no clue why some designs, like stippling, have been so popular for so long.
I just figured it had something to do with more quilters liking the design, so more quilters used it, and then more quilters wrote books and included instructions about it.
But around day 40, my opinion began to change. Stippling is so popular because stippling is FORMED in a very interesting way.
 Rather than depending on the edges of the design or the shapes formed before it, stippling is very independent.
You can upsize and downsize this design extremely easily and fit it into the most tiny, complex spaces, and it still manages to look terrific.
So I began to look for and create designs that worked similar to stippling and created Tree Roots, Wandering Clover, Circuit Board, Interlocking T, Alien Fingers, Cucumber Vine, Lollipop Chain, and Frog Eggs just to name a few.
These designs should be just as easily manipulated, upsized, and downsized as stippling because they are all formed in a similar way.
Then I started looking at other designs and experimenting with them around complex quilting motifs.
It’s one thing to stitch a design in a large open area with nothing to get into your way.
It’s entirely different to place a design in the middle of a quilting motif and try to have aspects of the design, like curvy lines, match up over and around a complicated area.
 I began to find immediately that designs like Matrix, an edge to edge design, is an absolute headache to stitch in complicated areas.
It’s a real pain in the neck to try to match up these lines and keep the distances consistent in tight areas.
So edge to edge designs work great in the open, uncomplicated areas of a quilt.
They can be expanded to easily cover your whole quilt top, or you can use them in the background, or sashing areas, so long as you don’t try to wiggle them around applique or complex quilting motifs.
The filler design type really can effect how easy it is to fill a particular area of your quilt. The easier a design fills the area, the faster the quilt gets finished.
I know it looks like I love to spend hours and hours quilting complex designs over my show quilts, but that’s simply not true.
I like to FINISH my quilts quickly. Speed is absolutely essential because the longer it takes to finish a quilt, the longer my whole life suffers. I don’t have a moderate button when it comes to quilting big quilts. It’s all or nothing and I’m typically quilting for long hours each day until the quilt is done.
I want to know when I sit down and choose a design that that design will quilt smoothly and effortlessly into the space with very little hair pulling or tears of frustration.
After all – quilting should be FUN!
Of course, keep in mind that the “Filler Design Type” information is really being geared to someone who is using the designs as fillers.
All of the designs in this project can be expanded to a larger scale to quilt over your whole quilt. If this is what you’re doing, basically any design will work anywhere on your quilt because you’re treating the quilt top like a blank canvas.
But if you want to quilt a special design around your applique, another design around your piecing shapes, and a third design in your borders, then you should pay attention to the filler design type information.
Typically I will include enough info to help you understand where the design can be used most easily. Here’s the info I included about Frog Eggs:
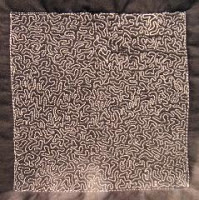
Filler Design Type – Independent. This is basically a combo of stippling and pebbling so it will work anywhere on your quilt. No matter how tight or complicated, you can always wiggle your stippling stitches to work in any area.
This info is meant to help you pick which design should go where on your quilt. With more than 100 designs to choose from, we’re now getting into a realm where picking one design can be difficult simply because there are so many!
Here’s a run down of each filler design type and where these designs work the best:
Interlocking – These designs interlock together to fill the space. You do have a lot of control over this design, so it will likely work great in all areas of your quilt. Fiery Comet is a good example of an interlocking design.
Independent – These are designs like Stippling that are formed from meandering lines. These designs are very versatile and are by far the easiest to stitch in small, complicated areas of your quilt.
Stacking – These are designs like Pebbling and Escargot where the design is built upon itself repeatedly in order to fill the space. These designs work really well in all areas of your quilt, but their time consuming nature often makes them a better choice for small, tight areas.
Stem Centered – These designs are started with an initial stem shape, then shapes are stitches off this shape to fill the remaining quilting space. These designs work really well in large, open areas where they can run free and show off.
Center Out – With designs like Poinsettia you start in the center of your quilting space and work your way to the edges. These designs work best in open spaces, like squares or circles, where the design has room to stretch out.
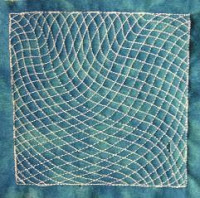
Edge to Edge – Best stitched in open, uncomplicated areas like sashing. You could also expand these designs to a larger scale and stitch them over your whole quilt. Pine Needles is a great example of a edge to edge design.
Edge to Center – This design can be stitched in any area, but probably would work best in open, less complicated areas. Flame Flower is a great example of an Edge to Center design.
Let’s go Quilt!
Leah

Leah, it is your explaining and thinking that has made me contemplate machine quilting in a whole different way. This post again, is one to think about. Now while we are quilting, why don't you take a real break and just be sick until you are well. I hate to see you beat yourself up about blogging which is suppose to be fun. Thanks for adding so much to quilting. Now go be sick and sleep. 🙂
Just wanted you to know that I LOVE your blog and follow at Google reader. You have answered so many questions and have given me so many fascinating ideas to play with. I also love the sound of your voice and the sound of your machine. When I read and watch your videos-I have to get up and at least approach my sewing machine to give it a loving pat> Thanks for inspiration!!
Dear Leah, thank you so much for these explanations, I really didn't mean to criticise you that you hadn't included them, it's just that I knew I would be able to appreciate your wonderful designs more, and make them work better if I could work out where to put them. I understand much better now, and really didn't mean to cause any stress to you, especially as you are ill. Hope you are feeling better soon x
Thought I would add my 5 cents here – after I said a big "THANK YOU !!!" for this wonderful blog. I love your ideas, I love your writing, and your way of explaining is great. And of course, I'm always happy to see a post from you. BUT – when you are sick, you are sick. We'll wait patiently till you're up and running again! So, have a good sleep, whish I could just swing by and make some hot tea for you ;-)) Take care, Frauke from Germany
Tess – No problem! I'd been needing to write this post for a LONG time and your comment just kicked me in gear.
Never hesitate to shoot suggestions my way!
Let's go Quilt!
Leah
Oh Leah, I hope you feel better 🙁 My little one has been sick (pretty much since Thanksgiving), and watching your videos on your blog is awesome at 3am while waiting for the little one to return to sleep.
Take a break and we look forward to more after the New Year. If anyone complains, they can go "stuff a turkey". Yep, that's our new saying at our house, and yep, we are still laughing:)
Happy Holidays!
Nancy Sue
Hey, Leah, sorry you are sick. Here's something to think about when you are coughing and can't sleep. When you are quilting some of your designs, you flip the little square around quite a bit. I can't help thinking, "that wouldn't be too easy with a queen sized quilt under there." What do you do with the flippy designs in that situation? Quilt them facing one way? Flip the large quilt around? Choose another design? Here's something else I thought of–I enjoyed your video about how you store your little quiltlets. I was wondering if you made a quilt sandwich 8 1/2" x 11" and drew four 4" squares on it, then you'd have the extra fabric for your hands without wasting those precious inches. Of course you could always cut them apart later if you wanted to sort them. I say "you" but I really mean "anyone". You yourself might want the little guys for your videos. Cheers!
Sally in Seattle
Hi Randy – Yep, you've caught on to my little white quilting lie:
– I'm really cheating by stitching 4" squares!
Yes, I agree, in a real queen sized quilt it would be very unlikely to be able to flip the whole thing around with each pass.
I'll post a diagram tomorrow with my quilting strategy guild on how exactly I plan and quilt big quilts.
There's no exact science behind it, but it might help you plan ahead for your next quilt.
Let's go quilt!
Leah
What an inspiration your blog has been for me. I keep referring back to it constantly. Your free motion quilting videos are my life line. Prior to your blog, I was hesitant in approaching free motion quilting, now I can hardly wait for the next tutorial. Thank you so much. I have all my practise blocks by my machine and if I mess up, I just try again on another block.